|
Getting Started with ModelMaker Introduction
by Robert Leahey of Thoughtsmithy
Introduction
Tutorial 1
Tutorial 2
Tutorial 3
Tutorial 4
Tutorial 5
Tutorial 6
Tutorial 7
Tutorial 8
Tutorial 9
Tutorial 10
ModelMaker Training
ModelMaker is an extremely powerful tool; as a result, like all powerful and extensive products, ModelMaker is complex and can be quite daunting to a new user. With that in mind, I��ve prepared this document as a starting place for those who see the potential in ModelMaker and wish to get up and running faster.
ModelMaker is often billed as a UML diagramming tool or a Delphi CASE tool. However, it is far more than a diagramming tool and the label �CASE tool?sometimes brings to mind some AI attempting to write code for you. A more accurate description of ModelMaker is that of a full-featured, extensible two-way code management tool with support for UML diagramming, design patterns, reverse engineering, refactoring, etc.
At its core, ModelMaker features an �active code model?�� all your classes and associated elements (units, diagrams, documentation, event types, etc.) are objects within the model. ModelMaker provides various views into this active model, allowing you to manipulate it from within a class list, member list or a diagram?When you��re ready, you can generate source code units from the model to be compiled by Delphi. Since the units are generated afresh each time (rather than MM working in the extant units), you can change various settings (such as code commenting options, code order, method instrumentation, etc.) and regenerate the units for a variety of purposes (instrumented code for debugging, heavily commented code for automated documentation generation, etc.).
Note that these tutorials are in no way comprehensive; there is more than one way to do most operations; and there are many, many options in the environment. But the following topics should give you a small taste of what ModelMaker is capable of. For more information or assistance, visit www.modelmakertools.com for downloadable documents. You can also request ModelMaker training services via Thoughtsmithy; see our Training Services page for details or contact us at info@thoughtsmithy.com.
1. Importing Existing Code
2. Visualizing Imported Classes
3. Creating Classes within Diagrams
4. Diagramming Overview
5. Implementing classes/The Member List
6. Delphi Integration
7. Commenting Code / Macros
8. Differencing
9. The Unit Code Editor
10. Advanced Stuff
-------------------------------------------------------------------------------------------------------
-------------------------------------------------------------------------------------------------------
Tutorial 1 �� Importing (and Generating) Code
by Robert Leahey of Thoughtsmithy
Introduction
Tutorial 1
Tutorial 2
Tutorial 3
Tutorial 4
Tutorial 5
Tutorial 6
Tutorial 7
Tutorial 8
Tutorial 9
Tutorial 10
ModelMaker Training
Warning: in order to avoid overwriting some of your production code, make a copy of the unit or units you are going to import before continuing.
The fastest way to see ModelMaker in action is to import some of your existing code.
Open ModelMaker and create a new model by selecting the New button or File|New.
At this point we are going to tell ModelMaker to import a source file �� it will reverse engineer the code it finds and add it to the model. Keep in mind that while ModelMaker��s parsing engine is good, it can only deal with so much obfuscated code formatting before it chokes. For most people, this is not an issue �� if MM encounters problems while importing your code, it will tell you.
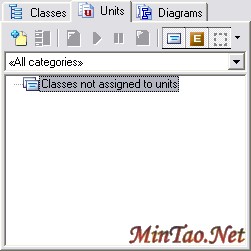
Figure 1 �� the empty Units View.
There are multiple ways to import a file, but the quickest way is via drag & drop.
In ModelMaker, select the Units View by pressing F4 or by selecting its tab.
Find the unit you wish to import in Windows Explorer and then position ModelMaker so that you can drag the file into MM��s main window.
Drop the unit into the Units View �� if you��re in a new project that is empty, the Units View should look like figure 1.
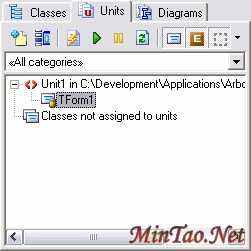
Figure 2 �� Units View with imported unit.
Once you have dropped the unit, it will be reverse-engineered. The unit and any classes it contains will be added to the Unit List, which should now look something like Figure 2.
Don��t worry if your icons look a little different �� I��ve got some ModelMaker extensions installed that can change the appearance of my screens.
The top-level node in the Unit View treeview represents the unit you��ve just imported. Any child nodes are the classes, interfaces or event types that reside in that unit. You can double-click these nodes to bring up their editors.
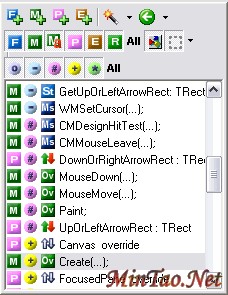
Figure 3 �� the Member List.
Note that if you select a class in the Unit View, all of its members (properties, methods, etc.) will be displayed in the Member List, which looks something like figure 3.
We��ll cover the Member List in Tutorial 5; for now it��s enough to notice that your class�� members are enumerated here.
Press F3 to switch to the Classes View. You should notice here a hierarchical representation of the classes you��ve imported. Figure 4 is an example.
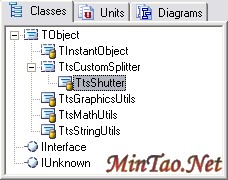
Figure 4 �� the Classes View.
Notice that TObject, IInterface and IUnknown are always present. Note also the appearance of my TtsCustomSplitter class in Figure 4 �� this is the ancestor of TtsShutter, which I��ve imported. However because I did not (yet) import the unit containing TtsCustomSplitter, this class must be represented as a ��placeholder�� (note the dotted lines around the class icon which denote placeholder status.) ModelMaker knows that TtsShutter descends from TtsCustomSplitter, but that��s all it knows. If I wish to be able to use ModelMaker��s features involving inheritance, I��d have to import TtsCustomSplitter��s unit.
ModelMaker is also capable of importing your in-source comments and attaching them to their associated entities, but only if the comments and/or ModelMaker are properly set up to do so. If MM��s Unit Code Editor (F7) shows a mass of unassociated code comments, fear not �� we��ll cover importing comments in Tutorial 7.
This is an extremely abbreviated example of how to import existing code. You can also perform imports using one of the two import buttons on the main toolbar.
 �C this button will import your code into a new model. �C this button will import your code into a new model.
 �C this button will import your code into the existing model.
In both cases, the buttons will give you the option of importing from a specific path or from a Source Path Alias (which we have not covered here). See Source Path Aliases in the ModelMaker help file for more information.
Generating Code
Obviously our ultimate goal is to create code which can be compiled in Delphi. ModelMaker uses its internal code model and applies the various formatting options you��ve selected to generate the specified units. �C this button will import your code into the existing model.
In both cases, the buttons will give you the option of importing from a specific path or from a Source Path Alias (which we have not covered here). See Source Path Aliases in the ModelMaker help file for more information.
Generating Code
Obviously our ultimate goal is to create code which can be compiled in Delphi. ModelMaker uses its internal code model and applies the various formatting options you��ve selected to generate the specified units.
 �� the Unlock Code Generation button. �� the Unlock Code Generation button.
 �� the Lock Code Generation button. �� the Lock Code Generation button.
 �� the Generate button. �� the Generate button.
 �� the Enable Auto Generation button. �� the Enable Auto Generation button.
 �� the Disable Auto Generation button.
In its default configuration, ModelMaker will not generate source code until you tell it to. To do so now, switch to the Units View by pressing F4 or by selecting the Units tab. Assuming you have one or more units containing classes (if you don��t, go back, use your new-found skills and import some units), first, make sure that code generation is enabled by clicking the Unlock Code Generation button in the main toolbar (see sidebar), then select a unit to generate and press the Generate button (found in the Units View toolbar �� see sidebar.) You should find that the specified unit has been regenerated by ModelMaker. If the unit was open in Delphi, you''''ll see that Delphi has already reloaded the new version of the file. This method is handy if you don''''t want to generate the code until you are ready.
However, if you wish, ModelMaker can be set to automatically regenerate a unit every time you make a change to that unit. This is called Auto Generation. You can enable or disable Auto Generation for each unit in your model by clicking either the Enable or Disable Auto Generation buttons in the Units View toolbar (see sidebar). Now, anytime you make a change to an Auto Generated unit, ModelMaker will regenerate the file. For that reason, care should be taken when enabling Auto Generation.
There are several other options and Delphi integration features which can effect when and how code is generated; we''''ll take a look at these options in Tutorial 6.
Return to the Introduction.
Go on to the next tutorial. �� the Disable Auto Generation button.
In its default configuration, ModelMaker will not generate source code until you tell it to. To do so now, switch to the Units View by pressing F4 or by selecting the Units tab. Assuming you have one or more units containing classes (if you don��t, go back, use your new-found skills and import some units), first, make sure that code generation is enabled by clicking the Unlock Code Generation button in the main toolbar (see sidebar), then select a unit to generate and press the Generate button (found in the Units View toolbar �� see sidebar.) You should find that the specified unit has been regenerated by ModelMaker. If the unit was open in Delphi, you''''ll see that Delphi has already reloaded the new version of the file. This method is handy if you don''''t want to generate the code until you are ready.
However, if you wish, ModelMaker can be set to automatically regenerate a unit every time you make a change to that unit. This is called Auto Generation. You can enable or disable Auto Generation for each unit in your model by clicking either the Enable or Disable Auto Generation buttons in the Units View toolbar (see sidebar). Now, anytime you make a change to an Auto Generated unit, ModelMaker will regenerate the file. For that reason, care should be taken when enabling Auto Generation.
There are several other options and Delphi integration features which can effect when and how code is generated; we''''ll take a look at these options in Tutorial 6.
Return to the Introduction.
Go on to the next tutorial.
[ORACLE]Oracle Supportȫ�������hot��21������(englis�� [�ݽ��´�]����Ķ�Ӣ�İ��� How to Read English Cases and��
|


 ע����վ��������Դ�ڻ���������Ȩ��ԭ�������У�������Ȩ����ԭ�����뱾վ��ϵ����վ������ɾ���� ��վ���³��ر�ע�������ת�أ�����ע�������� [MinTaoѧ��������]