|
ng = False
End Sub
''''InitDDraw函数初始化DirectDraw对象,包括建立主绘图平面以及后台绘图平面
Private Sub InitDDraw()
''''建立DirectDraw对象
Set g_dd = g_dx.DirectDrawCreate("")
''''设定DirectDraw对象的协作模式
g_dd.SetCooperativeLevel Me.hWnd, DDSCL_NORMAL
''''预先定义主绘图平面的属性
g_ddsd.lFlags = DDSD_CAPS
g_ddsd.ddsCaps.lCaps = DDSCAPS_PRIMARYSURFACE
''''建立主绘图平面
Set MainBuffer = g_dd.CreateSurface(g_ddsd)
g_ddsd.lFlags = DDSD_HEIGHT Or DDSD_WIDTH Or DDSD_CAPS
g_ddsd.ddsCaps.lCaps = DDSCAPS_OFFSCREENPLAIN Or DDSCAPS_3DDEVICE
g_dx.GetWindowRect Me.hWnd, g_rcDest
g_ddsd.lWidth = g_rcDest.Right - g_rcDest.Left
g_ddsd.lHeight = g_rcDest.Bottom - g_rcDest.Top
''''建立后台绘图平面
Set BackBuffer = g_dd.CreateSurface(g_ddsd)
''''将后台绘图平面的尺寸保存到g_rcSrc中
With g_rcSrc
.Left = 0: .Top = 0
.Bottom = g_ddsd.lHeight
.Right = g_ddsd.lWidth
End With
Dim pcClipper As DirectDrawClipper
Set pcClipper = g_dd.CreateClipper(0)
pcClipper.SetHWnd Me.hWnd
MainBuffer.SetClipper pcClipper
End Sub
''''InitD3D函数初始化Direct3D对象,包括3D设备、光源、视角以及材质
Sub InitD3D()
Dim d3d As Direct3D7
Dim ddsd As DDSURFACEDESC2
''''从DirectDraw对象中获得Direct3D对象
Set d3d = g_dd.GetDirect3D
''''获得DirectDraw对象的显示颜色深度,如果小于16位色,则程序出错退出
g_dd.GetDisplayMode ddsd
If ddsd.ddpfPixelFormat.lRGBBitCount <= 8 Then
MsgBox "本程序不支持颜色位数小于16bit的显示模式,程序将退出"
End
End If
On Error Resume Next
''''首先尝试建立硬件3维设备对象(HAL)
Set Direct3DDevice = d3d.CreateDevice("IID_IDirect3DHALDevice", BackBuffer)
''''如果Direct3DDevice为Nothing说明显示卡不支持硬件Direct3D设备
''''尝试建立RGB3维设备。
If Direct3DDevice Is Nothing Then
Set Direct3DDevice = d3d.CreateDevice("IID_IDirect3DRGBDevice", BackBuffer)
End If
''''定义视角区域
Dim VPDesc As D3DVIEWPORT7
VPDesc.lWidth = g_rcDest.Right - g_rcDest.Left
VPDesc.lHeight = g_rcDest.Bottom - g_rcDest.Top
VPDesc.minz = 0#
VPDesc.maxz = 1#
''''设置Direct3DDevice对象的视角
Direct3DDevice.SetViewport VPDesc
''''保存对视角的设置
With ViewPortRect(0)
.X1 = 0: .Y1 = 0
.X2 = VPDesc.lWidth
.Y2 = VPDesc.lHeight
End With
iViewSize = 4
End Sub
''''InitDeviceObjects函数建立三维物体
Private Sub InitDeviceObjects()
''''建立立方体的顶点数据
CreateCube g_vCube
''''通过位图文件建立三个纹理表面
Set TextureSurface1 = CreateTextureSurface("t1.bmp")
Set TextureSurface2 = CreateTextureSurface("t2.bmp")
Set TextureSurface3 = CreateTextureSurface("t3.bmp")
''''使用泛光源以及白色的普通材质
Dim mtrl As D3DMATERIAL7
''''定义材质对光源的的反射属性,你可以尝试改变它们的值看一下材质
''''的反射效果
mtrl.diffuse.r = 1#: mtrl.diffuse.g = 0#: mtrl.diffuse.b = 1#
mtrl.Ambient.r = 1#: mtrl.Ambient.g = 1#: mtrl.Ambient.b = 1#: mtrl.Ambient.a = 1
mtrl.emissive.r = 1#: mtrl.emissive.g = 0#: mtrl.emissive.b = 1#
mtrl.emissive.r = 1#: mtrl.specular.g = 1#: mtrl.specular.b = 1#
''''将材质的清晰度设置为10
mtrl.power = 10
Direct3DDevice.SetMaterial mtrl
''''设置Direct3DDevice的光源为泛光源,你可以尝试对SetRenderState函数的
''''第一个参数使用不同的值,看看光源的效果。
Direct3DDevice.SetRenderState D3DRENDERSTATE_AMBIENT, _
g_dx.CreateColorRGBA(1#, 1#, 0#, 1#)
Dim matProj As D3DMATRIX
g_dx.IdentityMatrix matProj
Call g_dx.ProjectionMatrix(matProj, 1, 1000, pi / 4#)
Direct3DDevice.SetTransform D3DTRANSFORMSTATE_PROJECTION, matProj
End Sub
''''CreateCube函数建立立方体的顶点数据
Private Sub CreateCube(vertices() As D3DVERTEX)
''''一个立方体有6个面,每面有是一个正方形,有4个顶点,下面共定义了
''''这6个面的24个顶点
g_dx.CreateD3DVertex -1, 1, -1, 0, 0, -1, 0, 0, vertices(0)
g_dx.CreateD3DVertex 1, 1, -1, 0, 0, -1, 1, 0, vertices(1)
g_dx.CreateD3DVertex -1, -1, -1, 0, 0, -1, 0, 1, vertices(2)
g_dx.CreateD3DVertex 1, -1, -1, 0, 0, -1, 1, 1, vertices(3)
g_dx.CreateD3DVertex -1, 1, 1, 0, 0, 1, 1, 0, vertices(4)
g_dx.CreateD3DVertex -1, -1, 1, 0, 0, 1, 1, 1, vertices(5)
g_dx.CreateD3DVertex 1, 1, 1, 0, 0, 1, 0, 0, vertices(6)
g_dx.CreateD3DVertex 1, -1, 1, 0, 0, 1, 0, 1, vertices(7)
g_dx.CreateD3DVertex -1, 1, 1, 0, 1, 0, 0, 0, vertices(8)
g_dx.CreateD3DVertex 1, 1, 1, 0, 1, 0, 1, 0, vertices(9)
g_dx.CreateD3DVertex -1, 1, -1, 0, 1, 0, 0, 1, vertices(10)
g_dx.CreateD3DVertex 1, 1, -1, 0, 1, 0, 1, 1, vertices(11)
g_dx.CreateD3DVertex -1, -1, 1, 0, -1, 0, 0, 0, vertices(12)
g_dx.CreateD3DVertex -1, -1, -1, 0, -1, 0, 0, 1, vertices(13)
g_dx.CreateD3DVertex 1, -1, 1, 0, -1, 0, 1, 0, vertices(14)
g_dx.CreateD3DVertex 1, -1, -1, 0, -1, 0, 1, 1, vertices(15)
g_dx.CreateD3DVertex 1, 1, -1, 1, 0, 0, 0, 0, vertices(16)
g_dx.CreateD3DVertex 1, 1, 1, 1, 0, 0, 1, 0, vertices(17)
g_dx.CreateD3DVertex 1, -1, -1, 1, 0, 0, 0, 1, vertices(18)
g_dx.CreateD3DVertex 1, -1, 1, 1, 0, 0, 1, 1, vertices(19)
g_dx.CreateD3DVertex -1, 1, -1, -1, 0, 0, 1, 0, vertices(20)
g_dx.CreateD3DVertex -1, -1, -1, -1, 0, 0, 1, 1, vertices(21)
g_dx.CreateD3DVertex -1, 1, 1, -1, 0, 0, 0, 0, vertices(22)
g_dx.CreateD3DVertex -1, -1, 1, -1, 0, 0, 0, 1, vertices(23)
End Sub
Public Function CreateTextureSurface(sFile As String) As DirectDrawSurface7
Dim ddsTexture As DirectDrawSurface7
Dim i As Long
Dim bIsFound As Boolean
Dim ddsd As DDSURFACEDESC2
''''定义纹理平面的属性
ddsd.lFlags = DDSD_CAPS Or DDSD_HEIGHT Or DDSD_WIDTH Or DDSD_PIXELFORMAT _
Or DDSD_TEXTURESTAGE
Dim TextureEnum As Direct3DEnumPixelFormats
''''获得当前Direct3DDevice支持的所有纹理类型
Set TextureEnum = Direct3DDevice.GetTextureFormatsEnum()
''''便历所有纹理类型,找到符合需要的类型
For i = 1 To TextureEnum.GetCount()
bIsFound = True
Call TextureEnum.GetItem(i, ddsd.ddpfPixelFormat)
With ddsd.ddpfPixelFormat
''''跳过不常使用的格式
If .lFlags And (DDPF_LUMINANCE Or DDPF_BUMPLUMINANCE Or DDPF_BUMPDUDV) Then
bIsFound = False
End If
''''跳过FourCC格式
If .lFourCC <> 0 Then bIsFound = False
''''跳过Alpha模式纹理
If .lFlags And DDPF_ALPHAPIXELS Then bIsFound = False
''''只使用16位颜色三维纹理,跳过其它的颜色设定
If .lRGBBitCount <> 16 Then bIsFound = False
End With
If bIsFound Then Exit For
Next i
If Not bIsFound Then
MsgBox "你的图形卡不支持16位颜色绘图平面"
End
End If
ddsd.ddsCaps.lCaps = DDSCAPS_TEXTURE
ddsd.ddsCaps.lCaps2 = DDSCAPS2_TEXTUREMANAGE
ddsd.lTextureStage = 0
sFile = App.Path + "\" + sFile
''''建立一个新的纹理绘图平面
Set ddsTexture = g_dd.CreateSurfaceFromFile(sFile, ddsd)
''''返回建立的纹理绘图平面
Set CreateTextureSurface = ddsTexture
End Function
运行程序,在窗口中会出现一个带贴图的立方体,按动上下左右方向键就可以向不同的方向滚动立方体,按动+、-键可以缩放立方体。
分析上面的程序,基本的实现过程大家可能已经有一些基本的了解,首先建立DirectX7对象,然后建立并初始化DirectDraw、再建立Direct3D对象。接下来利用CreateCube函数建立立方体框架,利用InitDeviceObjects函数为Direct3DDevice对象建立纹理、光照效果以及材质,利用RenderScene函数可以将不同的纹理赋予立方体不同的表面并将其绘制在DirectDrawSurface7对象。对于FrameMove函数中的内容可能大家不太了解。在Direct3D场景中有两个不同的坐标系,一个是以Direct3D场景的中心为坐标原点的坐标系,另外一个是以虚拟的观察者为中心的坐标系。在Direct3D世界中的对象的旋转、平移是通过改变对象的坐标系来实现的,D3DMATRIX对象定义了一个4*4的矩阵,Direct3D场景中的某一点到另外一点的变换是使用如下公式来进行的:
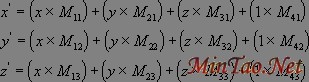
展开如下:
其中x''''、y''''、z''''为新坐标。FrameMove函数中的SetTransform方法就是根据D3DMATRIX对象定义的4*4的矩阵进行坐标系变换的函数。另外作者还编写了一个平移对象的FrameMove函数,函数如下:
Private Sub FrameMove(stepVal As Single, bType As Boolean)
    Dim matView As D3DMATRIX
    Dim matWorld As D3DMATRIX


    ''''建立线形矩阵
    g_dx.IdentityMatrix matView

    matView.rc11 = 1
    matView.rc22 = Cos(-0.5)
    matView.rc23 = Sin(-0.5)
    matView.rc32 = -Sin(-0.5)
    matView.rc33 = Cos(-0.5)
    matView.rc43 = iViewSize

    If bType Then
        g_dx.RotateXMatrix matView, stepVal
    Else
        g_dx.RotateYMatrix matView, stepVal
    End If
    Direct3DDevice.SetTransform D3DTRANSFORMSTATE_VIEW, matView

    g_dx.IdentityMatrix matWorld
    matWorld.rc11 = 1
    matWorld.rc22 = Cos(-0.5)
    matWorld.rc23 = Sin(-0.5)
    matWorld.rc32 = -Sin(-0.5)
    matWorld.rc33 = Cos(-0.5)
    matWorld.rc43 = iViewSize
    Direct3DDevice.SetTransform D3DTRANSFORMSTATE_WORLD, matWorld
End Sub
你可以将这个函数代入上面的程序运行,程序运行时首先按-键将立方体缩小,然后按动上下左右键看立方体是如何平移的。
接下来介绍Direct3D保留模式对象编程,由于Direct3D保留模式对象比较多而且相对立即模式使用起来比较简单,我们就来直接切入程序。
建立一个新的工程文件,保存文件,为了添加纹理,你需要在工程文件所在目录下建立一个名字为glass.bmp 的位图文件。加入DirectX7说明库,然后在Form1的代码窗口中假如以下代码:
Option Explicit
Dim g_dx As New DirectX7
Dim g_dd As DirectDraw4
Dim pcClipper As DirectDrawClipper
Dim g_ddsd As DDSURFACEDESC2
Dim MainBuffer As DirectDrawSurface4
Dim BackBuffer As DirectDrawSurface4
''''Direct3DRM对象
Dim D3DRM As Direct3DRM3
''''三维设备对象
Dim RMDevice As Direct3DRMDevice3
''''三维视区对象
Dim RMViewPort As Direct3DRMViewport2
''''三维场景对象
Dim RMFrameScene As Direct3DRMFrame3
Dim RMFrameCamera As Direct3DRMFrame3
Dim RMFrameDirLight As Direct3DRMFrame3
Dim RMFrameAmbientLight As Direct3DRMFrame3
''''光源对象
Dim RMDirLight As Direct3DRMLight
Dim RMAmbientLight As Direct3DRMLight
''''Direct3DRMMeshBuilder3对象是提供与mesh对象象交互作用的对象
''''一个mesh对象是一个由多个多边形组成德多面体
Dim meshbox As Direct3DRMMeshBuilder3
Dim framebox As Direct3DRMFrame3
Dim g_rcDest As RECT, g_rcSrc As RECT
Sub CleanUp()
Err.Clear
On Local Error Resume Next
Set RMFrameCamera = Nothing
Set RMFrameScene = Nothing
Set RMFrameDirLight = Nothing
Set RMFrameAmbientLight = Nothing
Set RMDirLight = Nothing
Set RMAmbientLight = Nothing
g_dd.RestoreDisplayMode
g_dd.SetCooperativeLevel Me.hWnd, DDSCL_NORMAL
Set BackBuffer = Nothing
Set MainBuffer = Nothing
Set g_dd = Nothing
Set RMViewPort = Nothing
Set RMDevice = Nothing
End Sub
Private Su上一页 [1] [2] [3] [4] [5] [6] 下一页
[常用软件]Flashget 1.x 简明教程 [网页制作]样式表CSS简明教程
[网页制作]CSS基础学习:样式表CSS简明教程 [网页制作]简明教程 SPAN和DIV的区别
[网页制作]XSL简明教程 [Web开发]推荐阅读HTML简明教程
|


 注:本站部分文章源于互联网,版权归原作者所有!如有侵权,请原作者与本站联系,本站将立即删除! 本站文章除特别注明外均可转载,但需注明出处! [MinTao学以致用网]